- Metal Fatigue -
Why Metal Parts Fail From Repeatedly-Applied Loads
NOTE: All our Products, Designs, and Services are SUSTAINABLE, ORGANIC, GLUTEN-FREE, CONTAIN NO GMO's, and will not upset anyone's precious FEELINGS or delicate SENSIBILITIES.
Long ago, engineers discovered that if you repeatedly applied and then removed a nominal load to and from a metal part (known as a "cyclic load"), the part would break after a certain number of load-unload cycles, even when the maximum cyclic stress level applied was much lower than the UTS, and in fact, much lower than the Yield Stress (UTS and YS are explained in Stress and Strain). These relationships were first published by A. Z. Wöhler in 1858.
They discovered that as they reduced the magnitude of the cyclic stress, the part would survive more cycles before breaking. This behavior became known as "FATIGUE" because it was originally thought that the metal got "tired". When you bend a paper clip back and forth until it breaks, you are demonstrating low-cycle fatigue behavior.
The following information on this page attempts to explain metal fatigue by answering several common questions:
- What is fatigue loading?
- How do you determine the fatigue strength of a material?
- Does the strength of a material affect its fatigue properties?
- Why is the surface of a part so important?
- Is fatigue life an exact number?
- Do real-world parts behave the same as laboratory tests?
- Are fatigue cycles cumulative?
WHAT IS FATIGUE LOADING?
There are different types of fatigue loading. One type is zero-to-max-to zero, where a part which is carrying no load is then subjected to a load, and later, the load is removed, so the part goes back to the no-load condition. An example of this type of loading is a chain used to haul logs behind a tractor.
Another type of fatigue loading is a varying load superimposed on a constant load. The suspension wires in a railroad bridge are an example of this type. The wires have a constant static tensile load from the weight of the bridge, and an additional tensile load when a train is on the bridge.
The worst case of fatigue loading is the case known as fully-reversing load. One cycle of this type of fatigue loading occurs when a tensile stress of some value is applied to an unloaded part and then released, then a compressive stress of the same value is applied and released.

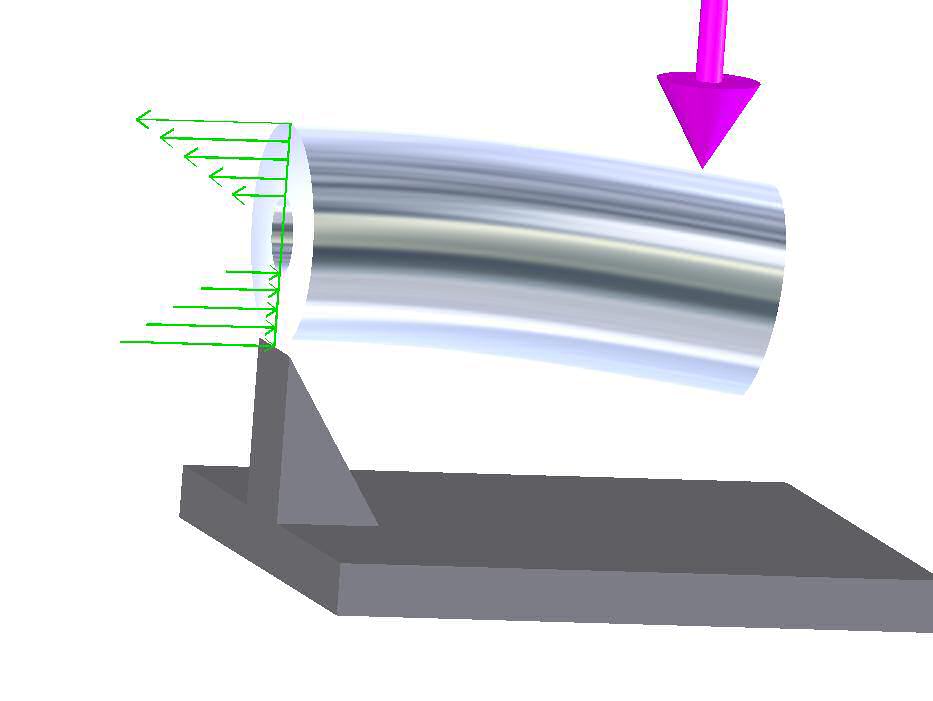
Figure 1
A rotating shaft with a bending load applied to it is a good example of fully reversing load. In order to visualize the fully-reversing nature of the load, picture the shaft in a fixed position (not rotating) but subjected to an applied bending load (as shown here). The outermost fibers on the shaft surface on the convex side of the deflection (upper surface in the picture) will be loaded in tension (upper green arrows), and the fibers on the opposite side will be loaded in compression (lower green arrows). Now, rotate the shaft 180° in its bearings, with the loads remaining the same. The shaft stress level is the same, but now the fibers which were loaded in compression before you rotated it are now loaded in tension, and vice-versa.
In fact, the laboratory mechanism used to test the fatigue life of materials is a rotating shaft with an applied bending load.
To illustrate how damaging fully-reversing load is, take a paper clip, bend it out straight, then pick a spot in the middle, and bend the clip 90° back and forth at that spot (from straight to "L" shaped and back). Because you are plastically-deforming the metal, you are, by definition, exceeding its yield stress. When you bend it in one direction, you are applying a high tensile stress to the fibers on one side of the OD, and a high compressive stress on the fibers on the opposite side. When you bend it the other way, you reverse the stresses (fully reversing fatigue). It will break in about 25 cycles.
The number of cycles that a metal can endure before it breaks is a complex function of the static and cyclic stress values, the alloy, heat-treatment and surface condition of the material, the hardness profile of the material, impurities in the material, the type of load applied, the operating temperature, and several other factors.
HOW IS THE FATIGUE STRENGTH OF A METAL DETERMINED?
The fatigue behavior of a specific material, heat-treated to a specific strength level, is determined by a series of laboratory tests on a large number of apparently identical samples of that specific material.
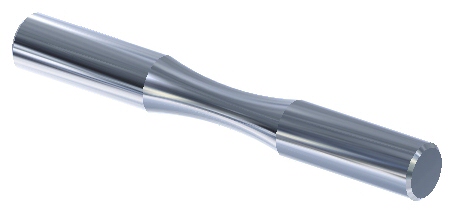
This picture shows a laboratory fatigue specimen. These laboratory samples are optimized for fatigue life. They are machined with shape characteristics which maximize the fatigue life of a metal, and are highly polished to provide the surface characteristics which enable the best fatigue life.

Figure 2
A single test consists of applying a known, constant bending stress to a round sample of the material, and rotating the sample around the bending stress axis until it fails. As the sample rotates, the stress applied to any fiber on the outside surface of the sample varies from maximum-tensile to zero to maximum-compressive and back. The test mechanism counts the number of rotations (cycles) until the specimen fails. A large number of tests is run at each stress level of interest, and the results are statistically massaged to determine the expected number of cycles to failure at that stress level.
The cyclic stress level of the first set of tests is some large percentage of the Ultimate Tensile Stress (UTS), which produces failure in a relatively small number of cycles. Subsequent tests are run at lower cyclic stress values until a level is found at which the samples will survive 10 million cycles without failure. The cyclic stress level that the material can sustain for 10 million cycles is called the Endurance Limit (EL).
In general, steel alloys which are subjected to a cyclic stress level below the EL (properly adjusted for the specifics of the application) will not fail in fatigue. That property is commonly known as "infinite life". Most steel alloys exhibit the infinite life property, but it is interesting to note that most aluminum alloys as well as steels which have been case-hardened by carburizing, do not exhibit an infinite-life cyclic stress level (Endurance Limit).
IS THERE ANY RELATIONSHIP BETWEEN UTS AND FATIGUE STRENGTH?

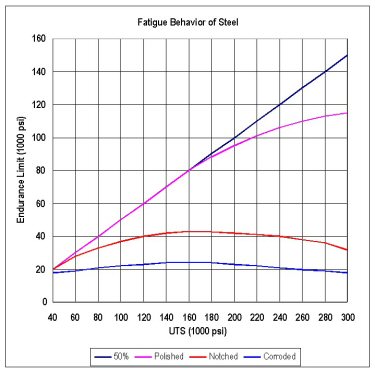
Figure 3
The endurance limit of steel displays some interesting properties. These are shown, in a general way, in this graph, (Figure 3) and briefly discussed below.
It is a simplistic rule of thumb that, for steels having a UTS less than 160,000 psi, the endurance limit for the material will be approximately 45 to 50% of the UTS if the surface of the test specimen is smooth and polished.
That relationship is shown by the line titled "50%". A very small number of special case materials can maintain that approximate 50% relationship above the 160,000 psi TS level.
However, the EL of most steels begins to fall away from the 50% line above a UTS of about 160,000 psi, as shown by the line titled "Polished".
For example, a specimen of SAE-4340 alloy steel, hardened to 32 Rockwell-C (HRc), will exhibit a UTS around 150,000 psi and an EL of about 75,000 psi, or 50% of the UTS. If you change the heat treatment process to achieve a hardness of about 50 HRc, the UTS will be about 260,000 psi, and the EL will be about 85,000 psi, which is only about 32% of the UTS.
Several other alloys known as "ultra-high-strength steels"(D-6AC, HP-9-4-30, AF-1410, and some maraging steels) have been demonstrated to have an EL as high as 45% of UTS at strengths as high as 300,000 psi. Also note that these values are EL numbers for fully-reversing bending fatigue. EL values for hertzian (contact) stress can be substantially higher (over 300 ksi).
The line titled "Notched" shows the dramatic reduction in fatigue strength as a result of the concentration of stress which occurs at sudden changes in cross-sectional area (sharp corners in grooves, fillets, etc.). The highest EL on that curve is about 25% of the UTS (at around 160,000 psi).
The surface finish of a material has a dramatic effect on the fatigue life. That fact is clearly illustrated by the curve titled "Corroded". It mirrors the shape of the "notched" curve, but is much lower. That curve shows that, for a badly corroded surface (fretting, oxidation, galvanic, etc.) the endurance limit of the material starts at around 20 ksi for materials of 40 ksi UTS (50%), increases to about 25 ksi for materials between 140 and 200 ksi UTS, then decreases back toward 20 ksi as the material UTS increases above 200 ksi.
WHY IS THE SURFACE SO IMPORTANT?
Fatigue failures almost always begin at the surface of a material. The reasons are that (a) the most highly-stresses fibers are located at the surface (bending fatigue) and (b) the intergranular flaws which precipitate tension failure are more frequently found at the surface.
Suppose that a particular specimen is being fatigue tested (as described above). Now suppose the fatigue test is halted after 20 to 25% of the expected life of the specimen and a small thickness of material is machined off the outer surface of the specimen, and the surface condition is restored to its original state. Now the fatigue test is resumed at the same stress level as before. The life of the part will be considerably longer than expected. If that process is repeated several times, the life of the part may be extended by several hundred percent, limited only by the available cross section of the specimen. (ref-3:8:6) That proves most fatigue failures originate at the surface of a component.
IS THE ENDURANCE LIMIT AN EXACT NUMBER?
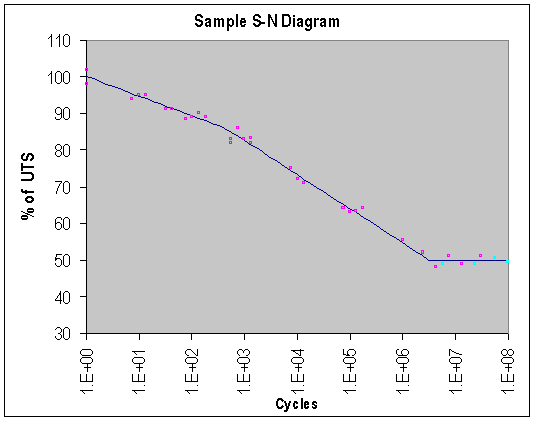
It is important to remember that the Endurance Limit of a material is not an absolute nor fully repeatable number. In fact, several apparently identical samples, cut from adjacent sections in one bar of steel, will produce different EL values (as well as different UTS and YS) when tested, as illustrated by the S-N diagram below. Each of those three properties (UTS, YS, EL) is determined statistically, calculated from the (varying) results of a large number of apparently identical tests done on a population of apparently identical samples.
The plot below shows the results of a battery of fatigue tests on a specific material. The tests at each stress level form statistical clusters, as shown. a curve is fitted through the clusters of points, as shown below. The curve which is fitted through these clusters, known as an "S-N Diagram" (Stress vs. Number), represents the statistical behavior of the fatigue properties of that specific material at that specific strength level. The red points in the chart represent the cyclic stress for each test and the number of cycles at which the specimen broke. The blue points represent the stress levels and number of cycles applied to specimens which did not fail. This diagram clearly demonstrates the statistical nature of metal fatigue failure.

Figure 4
DO REAL-WORLD COMPONENTS EXHIBIT THE "LABORATORY" EL?
Unfortunate experience has taught engineers that the value of the Endurance Limit found in laboratory tests of polished, optimized samples does not really apply to real-world components.
Because the EL values are statistical in nature, and determined on optimized, laboratory samples, good design practice requires the determination of the actual EL will be for each specific application, known as the Application-Specific Endurance Limit (ASEL).
In order to design for satisfactory fatigue life (prior to testing actual components), good practice requires that the "laboratory" Endurance Limit value be reduced
by several adjustment factors. These reductions are necessary to account for:
(a) the differences between the application and the testing environments, and
(b) the known statistical variations of the material.
This procedure is to insure that both the known and the unpredictable factors in the application (including surface condition, actual load, actual temperature, tolerances, impurities, alloy variations, heat-treatment variations, stress concentrations, etc. etc. etc.) will not reduce the life of a part below the required value. Please read that paragraph again, and understand it well.
An accepted contemporary practice (ref-2:3:328) to estimate the maximum fatigue loading which a specific design can survive is the Marin method, in which the laboratory test-determined EL of the particular material (tested on optimized samples) is adjusted to estimate the maximum cyclic stress a particular part can survive (the ASEL).
This adjustment of the EL is the result of six fractional factors. Each of these six factors is calculated from known data which describe the influence of a specific condition on fatigue life.
Those factors are:
- Surface Condition (ka): such as: polished, ground, machined, as-forged, corroded, etc. Surface is perhaps the most important influence on fatigue life;
- Size (kb): This factor accounts for changes which occur when the actual size of the part or the cross-section differs from that of the test specimens;
- Load (kc): This factor accounts for differences in loading (bending, axial, torsional) between the actual part and the test specimens;
- Temperature (kd): This factor accounts for reductions in fatigue life which occur when the operating temperature of the part differs from room temperature (the testing temperature);
- Reliability (ke): This factor accounts for the scatter of test data. For example, an 8% standard deviation in the test data requires a ke value of 0.868 for 95% reliability, and 0.753 for 99.9% reliability.
- Miscellaneous (kf): This factor accounts for reductions from all other effects, including residual stresses, corrosion, plating, metal spraying, fretting, and others.
These six fractional factors are applied to the laboratory value of the material endurance limit to determine the allowable cyclic stress for an actual part:
Real-World Allowable Cyclic Stress = ka * kb * kc * kd * ke * kf * EL
There is an additional adjustment factor that is undocumented and unacknowledged, KL, the LAWYER FACTOR, the effects of which are sometimes evident in purchased items.
IS FATIGUE LOADING CUMULATIVE?
It is important to realize that fatigue cycles are accumulative. Suppose a part which has been in service is removed and tested for cracks by a certified aircraft inspection station, a place where it is more likely that the subtleties of Magnaflux inspection are well-understood. Suppose the part passes the inspection, (i.e., no cracks are found) and the owner of the shaft puts it on the "good used parts" shelf.
Later, someone comes along looking for a bargain on such a part, and purchases this "inspected" part. The fact that the part has passed the inspection only proves that there are no detectable cracks RIGHT NOW. It gives no indication at all as to how many cycles remain until a crack forms. A part which has just passed a Magnaflux inspection could crack in the next 100 cycles of operation and fail in the next 10000 cycles (which at 2000 RPM, isn't very long!).
